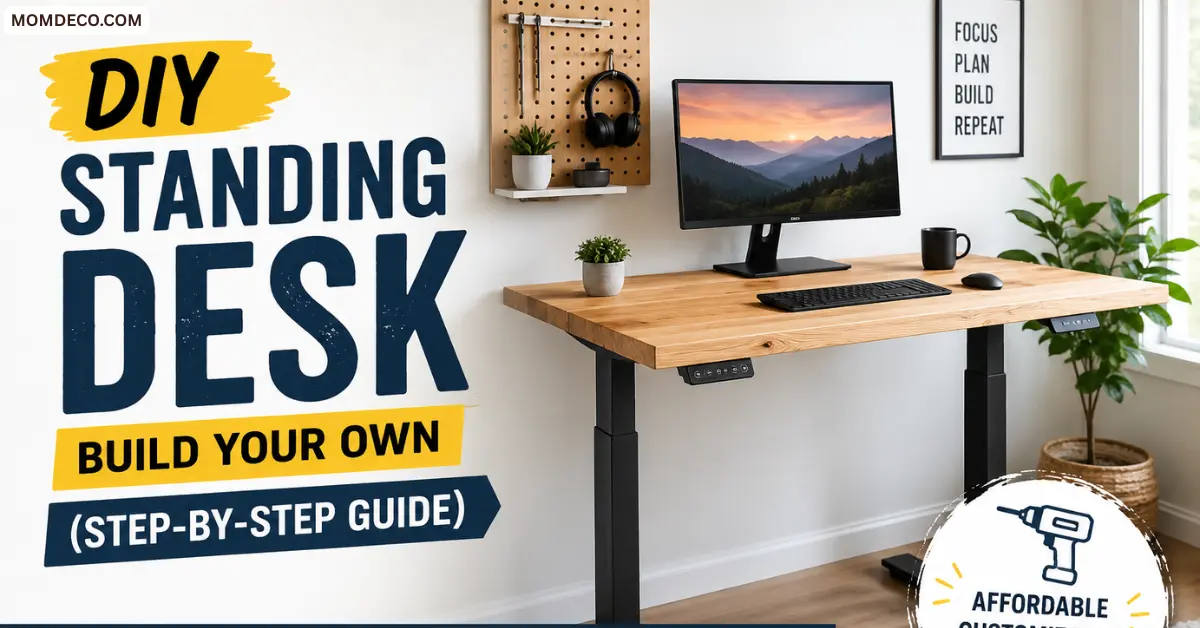
A commercial standing desk can cost anywhere from $400 to over $1,500. That’s a lot of money for what is, at its core, a flat surface held at the right height. The good news? You can build a DIY standing desk that’s sturdier, more personalized, and better looking — for a fraction of the price.
This guide doesn’t just show you pretty pictures of finished desks. It tells you exactly what height your desk should be, which build method matches your skill level and budget, what mistakes to avoid, and how to set up your workspace ergonomically once you’re done. That’s the information most competitors skip entirely.
Why Build a DIY Standing Desk?
Commercial standing desks are overpriced for a simple reason: brands sell the frame at a modest margin and make their real money on add-ons — solid wood tops, accessories, and cable management kits. When you DIY, you cut out all of that.
Here’s what you gain by building your own:
- Save real money. A solid-wood top from a brand-name desk company can add $700 over the base cost. You can DIY the same thing with white oak for under $200 in lumber.
- A perfect custom fit. Standard desks are designed for people around 6 feet tall. When you build your own, you set it to your exact ergonomic measurements from day one.
- Your style, exactly. L-shaped, two-tier, live-edge, industrial pipe — your space, your aesthetic. Commercial options almost never offer this range.
- Easy to modify later. Built with pipe fittings or a modular frame? You can change the height, add a shelf, or swap the top without starting over.
Find Your Correct Ergonomic Height First
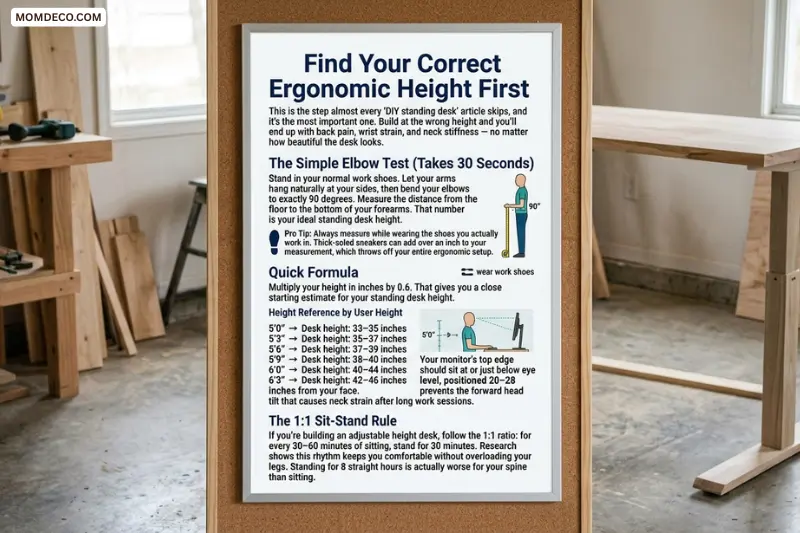
This is the step almost every “DIY standing desk” article skips, and it’s the most important one. Build at the wrong height and you’ll end up with back pain, wrist strain, and neck stiffness — no matter how beautiful the desk looks.
The Simple Elbow Test (Takes 30 Seconds)
Stand in your normal work shoes. Let your arms hang naturally at your sides, then bend your elbows to exactly 90 degrees. Measure the distance from the floor to the bottom of your forearms. That number is your ideal standing desk height.
Pro Tip: Always measure while wearing the shoes you actually work in. Thick-soled sneakers can add over an inch to your measurement, which throws off your entire ergonomic setup.
Quick Formula
Multiply your height in inches by 0.6. That gives you a close starting estimate for your standing desk height.
Height Reference by User Height
- 5’0″ → Desk height: 33–35 inches
- 5’3″ → Desk height: 35–37 inches
- 5’6″ → Desk height: 37–39 inches
- 5’9″ → Desk height: 38–40 inches
- 6’0″ → Desk height: 40–44 inches
- 6’3″ → Desk height: 42–46 inches
Your monitor’s top edge should sit at or just below eye level, positioned 20–28 inches from your face. This prevents the forward head tilt that causes neck strain after long work sessions.
The 1:1 Sit-Stand Rule
If you’re building an adjustable height desk, follow the 1:1 ratio: for every 30–60 minutes of sitting, stand for 30 minutes. Research shows this rhythm keeps you comfortable without overloading your legs. Standing for 8 straight hours is actually worse for your spine than sitting.
Six DIY Standing Desk Methods (With Skill Levels)
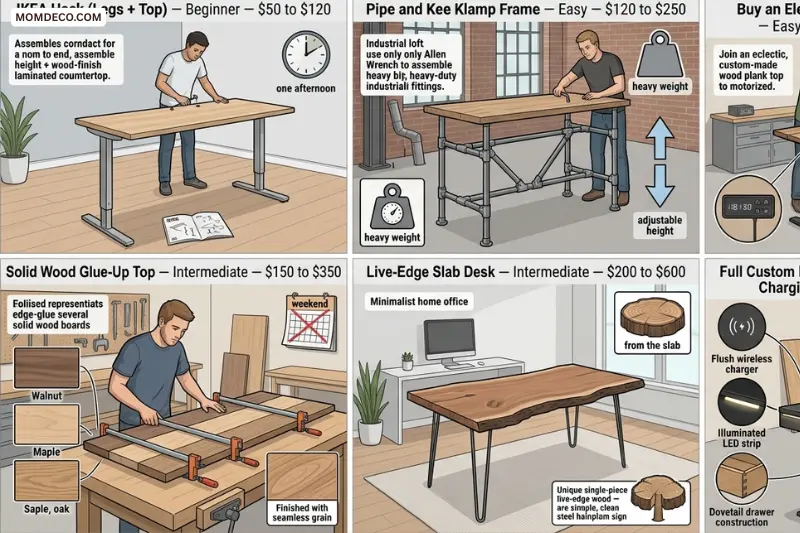
Not everyone has a workshop full of power tools. Here are six real approaches, from easiest to most advanced.
IKEA Hack (Legs + Top) — Beginner — $50 to $120
The easiest starting point. Pair an IKEA countertop with adjustable legs for a clean, functional desk in one afternoon. Fixed height only.
Pipe and Kee Klamp Frame — Easy — $120 to $250
Industrial look, tool-free assembly with just an Allen wrench. Holds serious weight and is adjustable in height after the fact. Ideal for a loft or workshop aesthetic.
Buy an Electric Frame + Build a Custom Top — Easy to Intermediate — $200 to $450
The best value for a forever desk. Buy a quality motorized frame and build your own wood top. You get smooth electric height adjustment at half the retail price of a commercial motorized desk.
Solid Wood Glue-Up Top — Intermediate — $150 to $350
For woodworkers who want a premium surface. Glue up boards of white oak, maple, or walnut. Commercial brands charge a $700 premium for what you can do yourself in a weekend.
Live-Edge Slab Desk — Intermediate — $200 to $600
A statement piece for a home office. A single slab of live-edge wood on a simple frame or pipe base looks extraordinary and one-of-a-kind.
Full Custom Build with Drawers, LED, and Wireless Charging — Advanced — $300 to $800+
For experienced woodworkers who want everything — custom drawers, built-in LED lighting, flush wireless charger, and an electric frame. The result is a desk that no commercial brand can match at any price.
Materials and Tools You’ll Need
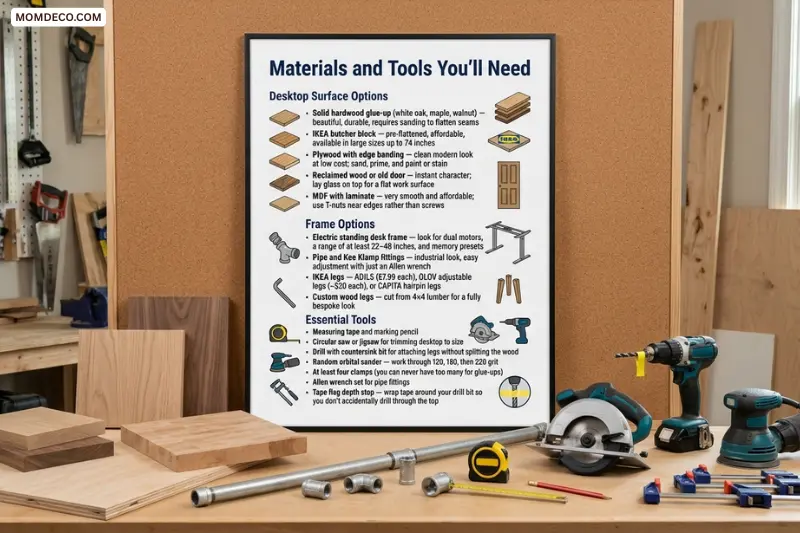
Desktop Surface Options
- Solid hardwood glue-up (white oak, maple, walnut) — beautiful, durable, requires sanding to flatten seams
- IKEA butcher block — pre-flattened, affordable, available in large sizes up to 74 inches
- Plywood with edge banding — clean modern look at low cost; sand, prime, and paint or stain
- Reclaimed wood or old door — instant character; lay glass on top for a flat work surface
- MDF with laminate — very smooth and affordable; use T-nuts near edges rather than screws
Frame Options
- Electric standing desk frame — look for dual motors, a range of at least 22–48 inches, and memory presets
- Pipe and Kee Klamp fittings — industrial look, easy adjustment with just an Allen wrench
- IKEA legs — ADILS ($7.99 each), OLOV adjustable legs (~$20 each), or CAPITA hairpin legs
- Custom wood legs — cut from 4×4 lumber for a fully bespoke look
Essential Tools
- Measuring tape and marking pencil
- Circular saw or jigsaw for trimming desktop to size
- Drill with countersink bit for attaching legs without splitting the wood
- Random orbital sander — work through 120, 180, then 220 grit
- At least four clamps (you can never have too many for glue-ups)
- Allen wrench set for pipe fittings
- Tape flag depth stop — wrap tape around your drill bit so you don’t accidentally drill through the top
Step-by-Step Build: The IKEA Hack Method
This is the most beginner-friendly approach with a great result. You’ll pair an IKEA countertop with adjustable legs and have a finished standing desk in an afternoon. No fancy tools required.
Step 1 — Calculate Your Desk Height Before Buying Anything
Use the elbow test or formula above and write down your exact standing desk height. Subtract the desktop thickness (typically 1.5–1.75 inches for IKEA tops) to find the height your legs need to reach. Buy legs that adjust to at least that number.
Step 2 — Choose Your Top and Legs
For most people, the IKEA Karlby (74″×24″) or Gerton (63″×29.5″) works perfectly. Pair with OLOV adjustable legs (adjusts 23–35 inches) or ADILS legs cut to height. For heights above 35 inches, you’ll need OLOV at maximum extension or an electric frame.
Step 3 — Sand and Finish the Top
Sand through 120, 180, then 220 grit. Apply a hard-wax oil finish, water-based polyurethane, or linseed oil in two coats minimum. Let fully cure for 24–48 hours before use. A desk finished in a hurry will show permanent water rings from mugs.
Step 4 — Mark and Pre-Drill Leg Positions
Flip the top upside down on a padded surface. Mark leg positions at least 3 inches from the edge and 12–16 inches inward from each corner. Pre-drill pilot holes with a countersink bit. Always use a tape flag depth stop on your drill bit.
Step 5 — Attach Legs, Level, and Check Height
Screw legs into position hand-tight first. Flip the desk upright and check with a spirit level. Make fine height adjustments before fully tightening. Put on your work shoes and stand at the desk — your elbows should rest comfortably at 90 degrees.
Step 6 — Drill a Cable Management Hole (Optional but Recommended)
Use a 2–2.5 inch Forstner bit to drill a cable grommet hole near the back of the desk. Add a rubber grommet cover for a clean finish. This small step makes the desk look far more professional and is much easier to do before the desk is fully assembled.
Upgrading to an Electric FrameBuying a quality electric frame and building your own custom top is the single best DIY standing desk decision you can make. Here’s why the numbers work in your favor.
- Commercial motorized desk with MDF top: $600–$1,500
- Commercial desk with solid wood top add-on: $1,100–$2,200+
- DIY electric frame + custom wood glue-up top: $400–$650
Look for a frame with dual motors, a height range of at least 22–48 inches, and memory presets to save your sitting and standing heights. Well-regarded options include the Flexispot E7, UPLIFT V2, and Fully Jarvis in the $250–$400 range.
Important: When attaching a solid wood top to a metal frame, use slotted mounting holes or figure-8 clips rather than fixed screws. Solid wood expands and contracts with humidity. If the top is rigidly bolted down at multiple fixed points, it can crack or warp over time.
Cable Management and Hidden Accessories
This section is what separates a professional-looking desk from a messy one. A beautifully built desk with cables everywhere still looks chaotic.
Cable Management Ideas
- Under-desk cable tray: A $15–$25 mesh tray screwed to the underside keeps your power strip and cables out of sight
- Adhesive cable clips: Route individual cables along desk legs and the underside of the top
- Grommet holes: Drill 2-inch holes with a Forstner bit, add rubber grommets, and cables pass through cleanly
- Cable spine for electric desks: Bundle the frame’s power cable so it doesn’t snag or stretch as the desk moves
Built-In Features Worth Adding
- Wireless phone charger: Route a Qi charger flush into a cutout in your desktop or monitor stand. Drill a tiny pinhole for an LED indicator so you always know where to place your phone. Costs $25–$40 and looks completely custom.
- Under-desk drawer: A small Baltic birch plywood drawer on soft-close slides, mounted with aluminum bar brackets, keeps your desk surface completely clear.
- LED task lighting: LED strips recessed into an aluminum channel under a monitor riser give beautiful, controllable ambient light. Use a Bluetooth controller to adjust color and brightness from your phone.
- Matching monitor stand: Build a monitor riser from your leftover desktop material so the whole setup looks cohesive and intentional.
Seven Mistakes Every First-Timer Makes
Mistake 1 — Building at a “Standard” Height Instead of Your Height
The most common mistake. Standard desk height is 29–30 inches, designed for someone close to 6 feet tall. If you’re 5’4″, that height will make you hunch for hours. Always calculate your personal ergonomic height before cutting anything.
Mistake 2 — Not Pre-Drilling Pilot Holes
Screwing directly into hardwood or plywood without pre-drilling will split the wood, especially near edges. Always pre-drill, and use a countersink bit so the screw head sits flush.
Mistake 3 — Applying Finish Too Soon
Rushing the finish is the number one regret. Sand through all grits, clean off the dust completely, and let each coat cure fully. A hurried finish will show water rings and scratches within weeks.
Mistake 4 — Rigidly Bolting a Solid Wood Top
Wood moves with the seasons. If you bolt a solid wood top to a metal frame at multiple fixed points, it has nowhere to go and will eventually crack. Always use floating hardware.
Mistake 5 — Choosing the Wrong Desk Depth
24 inches is the minimum for a comfortable setup. 30 inches is much better if your monitor sits directly on the desk. If you use a monitor arm, 24–26 inches is plenty. Too shallow forces your monitor too close and strains your eyes.
Mistake 6 — Skipping Cable Management Planning
Plan cable routing before you build, not after. Drill your grommet holes while the top is still bare wood. Retrofitting cable management on a finished desk is awkward and messy.
Mistake 7 — Standing All Day on Day One
Your body needs to adapt. Start with 15–30 minutes of standing per hour and build up over two to three weeks. Jumping straight to 8 hours of standing causes leg and foot pain that makes people abandon their standing desks permanently.
Ergonomic Setup Checklist After Building
Your desk is built — now set it up correctly.
- Desk height: Forearms parallel to the desk, elbows at roughly 90 degrees, shoulders relaxed and not raised
- Monitor position: Top edge at or just below eye level, screen 20–28 inches from your face, tilted 10–20 degrees back
- Keyboard and mouse: Same level, within easy reach, wrists straight while typing
- Anti-fatigue mat: Place one under your feet when standing to encourage micro-movements and reduce joint fatigue
- Monitor arm: Allows quick repositioning every time you switch from sitting to standing
- Footwear: Always adjust your desk while wearing the shoes you actually work in
- Standing schedule: Sit for 30–60 minutes, stand for 30 minutes, repeat throughout the day
- Movement breaks: Every 30 minutes, do 60 seconds of calf raises, wrist rolls, and neck stretches
The research is clear: the health benefits of a standing desk come from movement and postural variety, not from standing itself. A standing desk used at the correct height, with regular position changes and short movement breaks, reduces back pain, improves afternoon energy, and boosts focus. The desk is the tool — how you use it makes all the difference.
Frequently Asked Questions
How much does it cost to build a DIY standing desk?
It depends on the method you choose. A basic IKEA hack costs $50–$120. A pipe and Kee Klamp frame runs $120–$250. The best value option — an electric frame with a custom wood top — costs $400–$650. A full custom build with drawers and LED lighting can reach $800 or more.
What is the correct height for a DIY standing desk?
There is no one-size-fits-all answer. The easiest way to find your correct height is to stand in your work shoes, bend your elbows to 90 degrees, and measure from the floor to the bottom of your forearms. That number is your ideal desk height. As a quick formula, multiply your height in inches by 0.6.
Can a beginner build a DIY standing desk?
Absolutely. The IKEA hack method requires no power tools, no woodworking experience, and no special skills. You simply attach legs to a countertop, sand, finish, and you’re done. Most beginners finish their first desk in a single afternoon.
Is it better to buy an electric frame or build fixed-height legs?
If your budget allows, an electric frame is worth it. It lets you switch between sitting and standing throughout the day without any effort, which is how you actually get the health benefits of a standing desk. Fixed-height desks work well, but you lose the flexibility to sit when your legs are tired.
What is the best wood for a DIY standing desk top?
White oak, maple, and walnut are the top choices for durability and appearance. White oak is especially popular because it is hard, resists moisture well, and has beautiful grain. IKEA butcher block in beech or oak is a great budget alternative that comes pre-flattened and ready to finish.
How do I stop my DIY standing desk from wobbling?
Wobble usually comes from uneven legs or a frame that is not properly tightened. Make sure all legs are fully tightened and level. If you are using a pipe frame, check that all Kee Klamp set screws are tight. For electric frames, always choose a dual-motor frame over a single-motor one — dual motors are significantly more stable at full height.
Do I need an anti-fatigue mat with a standing desk?
Yes, strongly recommended. Standing on a hard floor for extended periods puts stress on your feet, knees, and lower back. An anti-fatigue mat encourages small, natural weight shifts that keep your joints comfortable. It is one of the cheapest and most effective accessories you can add to your standing desk setup.
How long should I stand at my DIY standing desk each day?
Start small — 15 to 30 minutes of standing per hour — and build up gradually over two to three weeks. The ideal long-term rhythm is the 1:1 rule: 30 minutes sitting followed by 30 minutes standing. Standing all day is not the goal and can cause its own problems, including leg fatigue and varicose veins.
What size should my DIY standing desk be?
For most people, 60 inches wide and 24–30 inches deep is the sweet spot. If you use a monitor arm, 24 inches of depth is enough. If your monitor sits directly on the desk, go for at least 28–30 inches of depth so the screen is not too close to your face. For dual monitor setups, aim for at least 63–72 inches of width.
Can I convert my existing desk into a standing desk?
Yes. The easiest way is to use a desktop standing desk converter — a platform that sits on top of your existing desk and raises your monitor and keyboard to standing height. These range from $50 to $300. Alternatively, you can raise your entire desk by replacing the legs with taller ones or adding bed risers under the existing legs for a quick, low-cost fix.
Final Thought
Building a DIY standing desk is one of the smartest home office investments you can make — not just for your wallet, but for your health and productivity.
You don’t need to be a master woodworker. You don’t need an expensive workshop. Whether you spend $60 on an IKEA hack or $600 on a full custom build with solid wood and an electric frame, the process is simpler than most people expect.
The one thing that matters more than anything else is getting your height right. A beautiful desk at the wrong height is just an expensive way to hurt your back. Measure first, build second.
Start with the method that matches your skill level and budget today. You can always upgrade the top, add drawers, or switch to an electric frame later. The beauty of building your own is that nothing is permanent — it grows with you
Once you’re done, set it up ergonomically, follow the 1:1 sit-stand rule, and give your body two to three weeks to adjust. Most people who do this properly say they can’t imagine going back to a sitting-only desk.