Have you ever opened your closet door and instantly felt overwhelmed? You are not alone. A chaotic closet sets the wrong tone for your whole day. The good news is that a DIY walk-in closet is more achievable than most people think — and you do not need a massive budget or professional contractor to make it happen.
Whether you are converting a spare room, a large reach-in closet, or a forgotten corner of your bedroom, this guide walks you through every step. You will learn how to plan your layout, choose the right materials, build built-in shelving, add smart lighting, and style everything to feel like a luxury boutique. Let us get started.
What Is a DIY Walk-In Closet?
A DIY walk-in closet is a dedicated storage room or large closet space that you design, build, and organize yourself — without hiring a professional closet company. Unlike standard reach-in closets, a walk-in closet gives you room to physically enter the space, making it far easier to see, access, and organize your entire wardrobe.
The beauty of doing it yourself is complete customization. You decide the layout, the depth of shelves, the number of hanging rods, the drawer configuration, and the style. You also save thousands of dollars compared to custom closet companies.
Step 1: Plan Your DIY Walk-In Closet Layout
Good planning saves you time, money, and frustration. Before you buy a single board or screw, spend time thinking about how you actually use your wardrobe.
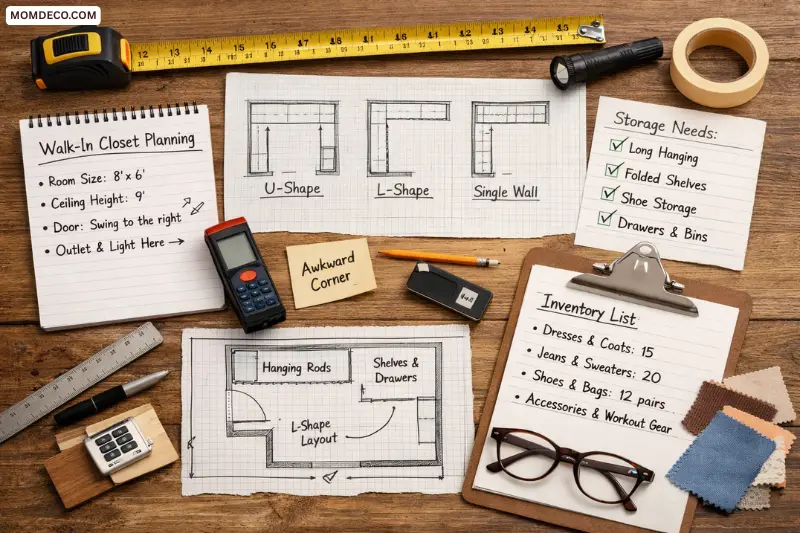
Measure Your Space First
Grab a tape measure and note:
- The total width and depth of the room or closet space
- Ceiling height
- Door swing direction
- Location of any electrical outlets or light fixtures
- Any awkward angles, corners, or windows
A standard walk-in closet needs at least 4 feet of depth to function comfortably. If your space is narrower, you can still make it work by using one side for hanging and the opposite wall for shelving.
Sketch Your Layout
Draw a simple floor plan on paper. Most walk-in closets use one of these three layouts:
- U-shaped: Storage runs along three walls. Best for larger spaces. Maximizes every inch.
- L-shaped: Storage along two adjacent walls. Works well in medium-sized spaces.
- Single wall: All storage along one wall. Ideal for narrow or small walk-in closets.
Decide What You Need to Store
Make a list before you design. Ask yourself:
- How many long garments do I own? (dresses, coats, formal wear)
- How many folded items? (jeans, sweaters, t-shirts)
- How many shoes and bags?
- Do I need drawer space for intimates, accessories, or workout gear?
This inventory drives your entire design. Most people underestimate how much hanging space they need and overestimate how many shelves they will use.
Step 2: Choose Your DIY Walk-In Closet System
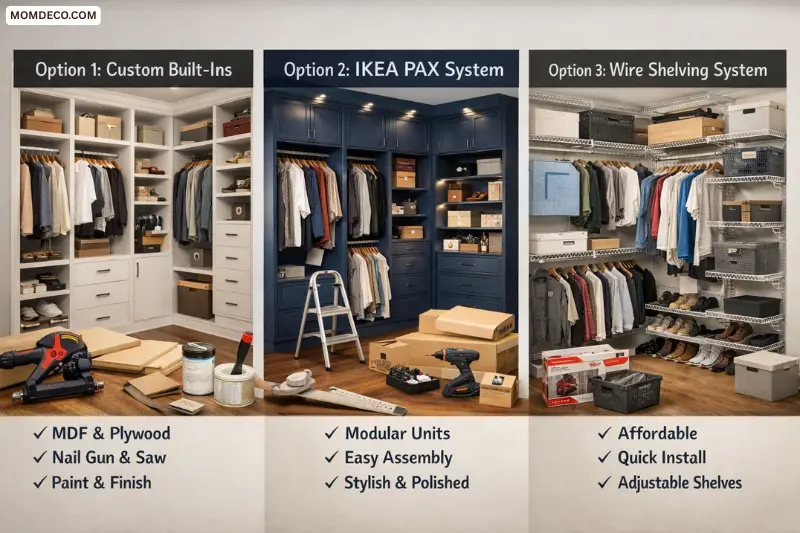
There are three main approaches to building a DIY walk-in closet. Each has advantages depending on your skill level and budget.
Option 1: Fully Custom Built-Ins (Best Results, Moderate Skill)
This is the most rewarding approach. You build the shelving units yourself using MDF (medium-density fiberboard) or plywood sheets. MDF is the most popular choice because it is affordable, smooth, easy to paint, and takes screws well.
What you need:
- 3/4-inch MDF sheets (4×8 feet)
- Circular saw or table saw
- Nail gun and 2-inch brad nails
- Level and square
- Clamps
- Wood filler and sandpaper
- Primer and paint
Basic build process:
- Rip MDF into side panels at ceiling height minus 4 inches. Make each panel about 14 to 24 inches deep depending on its purpose — 24 inches for hanging sections, 14 to 16 inches for shoe shelves.
- Cut shelves to match the width of each unit.
- Attach shelves to the side panels using brad nails, working from the outside in. Use clamps and spacers to keep shelf spacing consistent.
- Secure each completed unit to the wall by screwing through the top back rail into wall studs.
- Fill nail holes, sand smooth, prime, and paint.
The result looks fully custom and built-in — because it is.
Option 2: IKEA PAX System (Easiest, Polished Look)
The IKEA PAX wardrobe system is a favorite among DIYers for good reason. The pieces are affordable, modular, and designed to look built-in with a little extra effort. You can paint the frames, add crown molding to the tops, and use decorative hardware to make them look completely custom.
The PAX system works best when you:
- Build a filler strip around the top to reach the ceiling
- Paint the units a bold color (deep green, navy, or black read as luxurious)
- Use matching hardware throughout
- Add interior lighting
Budget for a basic PAX setup: $500 to $1,500 depending on size and add-ons.
Option 3: Wire or Freestanding Systems (Budget-Friendly, No Tools)
Products from brands like ClosetMaid or Rubbermaid offer adjustable wire shelving that installs directly onto walls with brackets. These systems are the fastest to install and the most budget-friendly, starting around $100 for a small closet.
The downside is aesthetics. Wire shelves are functional but rarely look polished. If you go this route, add wallpaper, a fresh coat of paint, and some decorative baskets to elevate the look.
Step 3: Build the Right Zones for Your Walk-In Closet
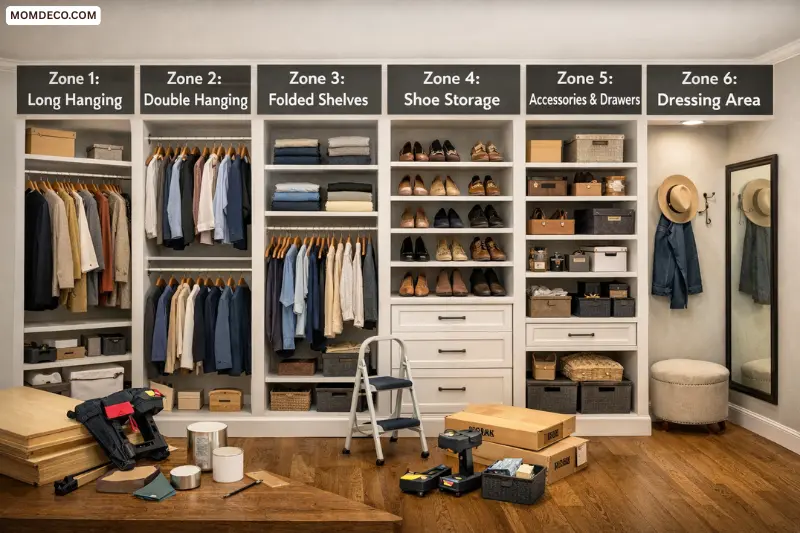
This is something most competitor articles miss entirely. A truly functional DIY walk-in closet is built around zones — dedicated areas for specific categories of clothing and accessories. Zones make getting dressed faster and keep your closet organized long term.
Zone 1: Long Hanging
Reserve at least one section for full-length garments. Dresses, coats, and suits need 60 to 72 inches of vertical clearance. Make this section 24 inches deep and at least 36 inches wide.
Zone 2: Double Hanging
Double hanging stacks two shorter rods — one at 40 inches from the floor and one at about 80 inches. This doubles your hanging capacity for shirts, jackets, blouses, and folded trousers. It is one of the most efficient configurations in a walk-in closet.
Zone 3: Shelving for Folded Items
Open shelves work well for jeans, sweaters, and t-shirts. Keep shelves between 12 and 16 inches apart so items stay visible and accessible. Do not stack more than three or four items per shelf — deep stacks lead to digging and mess.
Zone 4: Shoe Storage
Shoes need dedicated space. Standard shoe shelves are 7 inches apart for flats and sneakers and 10 to 12 inches apart for boots and heels. Build shoe shelves at a slight angle (about 15 degrees) for a display-style look that also saves vertical space.
Zone 5: Accessories and Drawers
Jewelry, scarves, belts, and bags need their own spot. Drawers are ideal for small accessories. A section of open cubbies (about 12 by 12 inches each) works beautifully for bags and bins. If you are building custom units, plan at least two or three drawer openings.
Zone 6: A Dressing Area
This is the detail most closet articles skip completely. If your space allows, designate a small area for a full-length mirror, a small stool or pouf, and a hook for the outfit you are planning to wear. This simple addition makes your closet feel like a personal dressing room and speeds up your morning routine dramatically.
Step 4: Lighting Makes or Breaks Your DIY Walk-In Closet
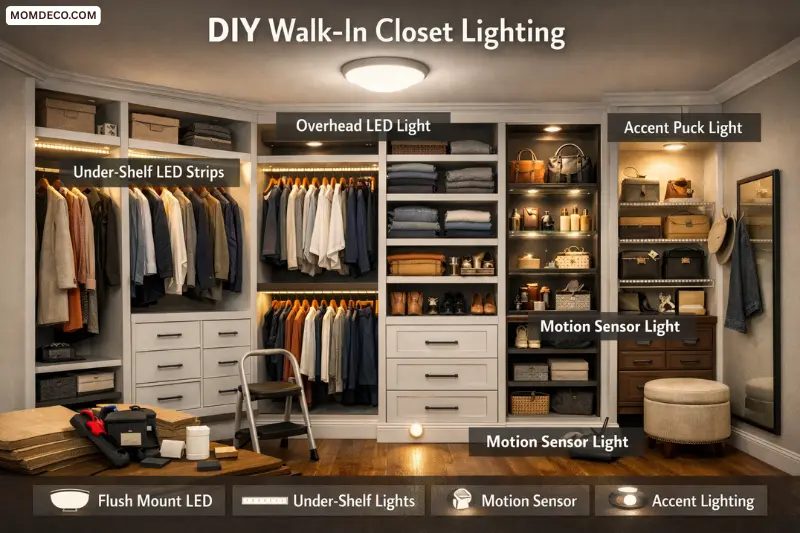
Poor lighting is the number-one complaint people have about closets — and it is one of the easiest things to fix. Good lighting helps you see colors accurately, find items quickly, and enjoy spending time in the space.
Types of Closet Lighting
- Overhead lighting: A flush-mount or semi-flush ceiling light is the foundation. LED panels are energy-efficient and provide even, shadow-free light.
- Under-shelf LED strip lighting: Stick-on LED strips underneath shelves illuminate hanging sections and prevent the dark spots that make closets feel cramped. These are inexpensive and easy to install without any electrical work.
- Motion-activated lights: A practical touch for smaller closets. The light turns on when you walk in and off when you leave. No fumbling for switches.
- Accent lighting: If you have a glass-front display section for bags, perfumes, or accessories, a small puck light inside creates a boutique feel.
Aim for at least 50 foot-candles of light in a closet. Warm white bulbs (2700K to 3000K) are flattering for getting dressed; cooler bulbs (4000K) make colors easier to distinguish.
Step 5: Make a Small Walk-In Closet Work Harder
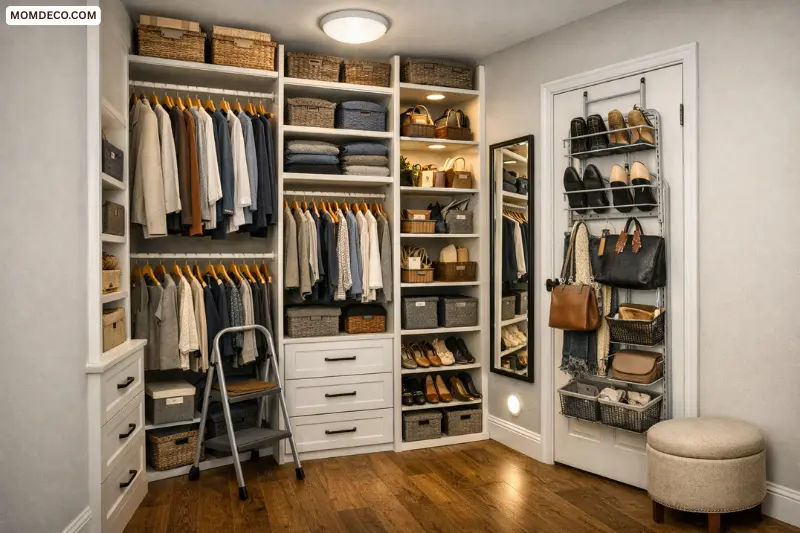
You do not need a large room to have a functional walk-in closet. Many of the most satisfying closet transformations happen in spaces under 50 square feet. Here is how to maximize a small DIY walk-in closet:
- Go vertical. Build shelving all the way to the ceiling. Use a small step stool to access the top shelves for seasonal items and rarely used pieces.
- Use the back of the door. An over-the-door rack adds storage for shoes, accessories, or cleaning supplies without using any floor or wall space.
- Add mirrors strategically. A full-length mirror on one wall visually doubles the size of the space. It also keeps you from needing one in your bedroom.
- Choose consistent storage bins. Mismatched boxes and bags make even a well-built closet look cluttered. Use matching bins or baskets on open shelves for a clean, cohesive look.
- Edit your wardrobe before you build. Do a thorough declutter before finalizing your design. Building a space around clothes you no longer wear wastes both storage and money.
Step 6: Add Style and Personality
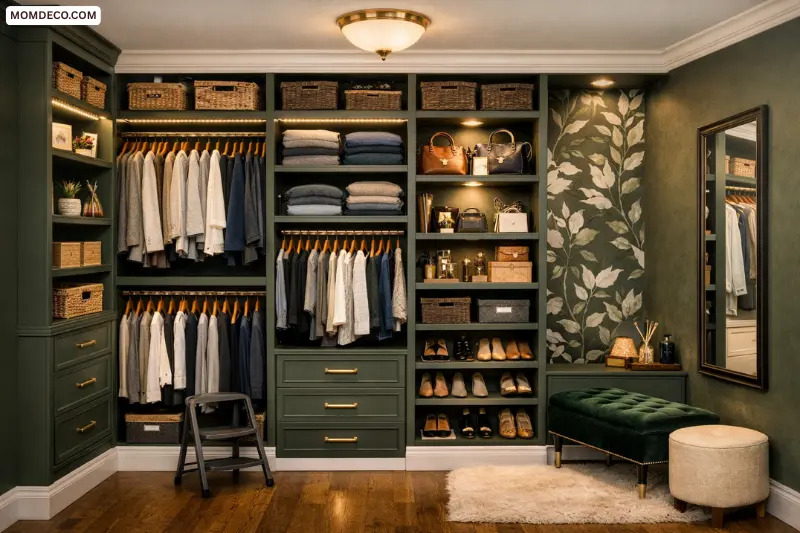
A DIY walk-in closet should feel like a room you enjoy being in — not just a functional box. Here are the design touches that elevate a basic closet into a beautiful space:
Wallpaper or Paint
Adding wallpaper to the back wall of a closet is one of the most impactful upgrades you can make. Botanical prints, geometric patterns, and textured wallpapers all look stunning. If wallpaper feels like too much commitment, removable peel-and-stick wallpaper works beautifully and is renter-friendly.
For paint, deep moody colors — forest green, navy blue, charcoal, or dusty rose — make a closet feel intentional and luxurious.
Hardware
Swap out basic white knobs for brass, matte black, or antique bronze hardware. This one change can take a closet from builder-grade to bespoke in an afternoon.
Crown Molding and Baseboards
Adding crown molding to the top of your built-in units and trimming the bottom with baseboard molding makes custom units look truly built-in. It fills the gap between the unit and the ceiling beautifully.
A Cozy Seating Element
A small upholstered stool, a velvet bench, or even a padded floor cushion adds a luxurious and functional element. Sitting down to put on shoes is a simple comfort that makes your dressing experience noticeably better.
A Scent
This is entirely overlooked in closet design articles. Place a small sachet of cedar, lavender, or a light fragrance in your closet. Cedar naturally repels moths and keeps clothes smelling fresh. It is the invisible detail that makes your closet feel truly curated.
DIY Walk-In Closet Budget Breakdown
One of the biggest advantages of a DIY walk-in closet is the cost savings. Here is a realistic look at what you can expect to spend:
- Budget build (wire shelving + paint + accessories): $100 to $300
- Mid-range build (IKEA PAX system + paint + hardware + lighting): $500 to $1,500
- Full custom MDF built-ins (materials only): $400 to $800 for an average-sized closet
- Full custom with all finishes (molding, hardware, wallpaper, lighting): $800 to $2,000
For comparison, professional custom closet companies typically charge $3,000 to $10,000 or more for similar results. A thoughtful DIY walk-in closet build delivers the same look at a fraction of that cost.
Common DIY Walk-In Closet Mistakes to Avoid
- Not anchoring units to studs. Loaded shelving is heavy. Always screw into wall studs, not just drywall. Use a stud finder before installing.
- Making all shelves the same depth. Shoe shelves should be shallower (12 to 14 inches) than hanging sections (24 inches). One-size-fits-all depth wastes space.
- Forgetting to account for door swings. Check that shelving and doors will not collide when the door opens fully.
- Skipping the primer. MDF absorbs paint unevenly without primer. Always prime before painting for a smooth, professional finish.
- Rushing the declutter step. Building a closet around too many items guarantees clutter returns quickly. Edit first, then build.
Frequently Asked Questions About DIY Walk-In Closets
1. How much space do I need for a walk-in closet?
The minimum recommended size is 4 feet wide by 4 feet deep, which gives you enough room to enter and use one wall of storage. A more comfortable walk-in closet is 5 by 7 feet or larger, allowing storage on multiple walls and a small dressing area.
2. What is the best material for DIY closet shelving?
3/4-inch MDF (medium-density fiberboard) is the most popular choice because it is smooth, affordable, easy to paint, and widely available at home improvement stores. Plywood is stronger and more moisture-resistant, making it a good choice if your closet has any humidity concerns.
3. Can I build a walk-in closet without any construction experience?
Yes. If you are using an IKEA PAX system or a modular wire system, no cutting or construction skills are required. For custom MDF built-ins, you need basic skills with a saw and nail gun, but these are learnable skills and many tutorials walk you through every step.
4. How do I make a small closet feel like a walk-in?
Focus on maximizing vertical space, using consistent storage containers, adding under-shelf lighting, and keeping the color palette cohesive. A full-length mirror on one wall also creates the illusion of a larger, more open space.
5. Do I need a permit to build a DIY walk-in closet?
In most cases, no. Building shelving and storage units inside an existing room does not require a permit because you are not changing the structure of the home. However, if your project involves moving walls, adding electrical circuits, or significant structural changes, check with your local building authority.
6. How long does it take to build a DIY walk-in closet?
A simple wire or modular system can be installed in a weekend. A full custom MDF built-in closet typically takes two to four weekends for a first-time builder, including time for cutting, assembly, painting, and finishing.
7. What is the best lighting for a walk-in closet?
LED lighting is best — it is energy-efficient, long-lasting, and produces minimal heat. Combine an overhead flush-mount fixture with under-shelf LED strip lights for even, shadow-free illumination throughout the entire space.
8. How do I prevent a walk-in closet from becoming cluttered again?
The secret is designing specific zones for every category of clothing, building enough storage that nothing gets piled on top of something else, and committing to a regular declutter — at minimum once per season. When every item has a designated home, clutter naturally stays under control.
Final Thoughts
A DIY walk-in closet is one of the most satisfying home improvement projects you can take on. You start with a chaotic, underused space and end up with a beautifully organized room that simplifies your daily routine, protects your clothes, and adds genuine value to your home.
The key to success is planning before you build. Measure carefully, map out your zones, choose a system that fits your skill level and budget, and do not skip the finishing touches. Crown molding, good lighting, consistent hardware, and a bold paint color are what separate a functional closet from one you are proud to show off.
Start with the plan. The rest follows naturally.